Document Batches
Overview:
The Batch feature permits you to print PPA Restatements, Annual Notices, Summary of Benefits and Coverage (SBCs) and Carryover Amendments for all of your clients in a few easy steps. Note: This feature is only available to Annual Document Subscribers.
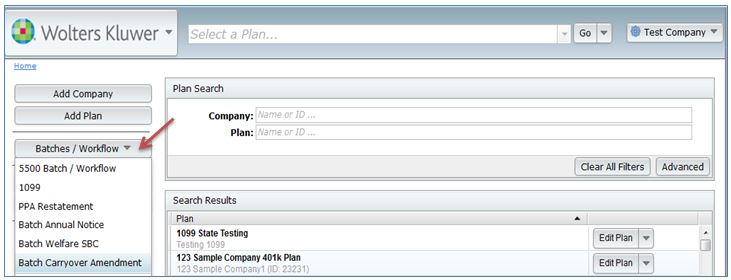
To use the applicable batch feature(s), select from the applicable Batch in the drop-down ("PPA Restatement", "Batch Annual Notice", "Batch Welfare SBC" or "Batch Carryover Amendment") on the "Home" page under "Batches/Workflow".
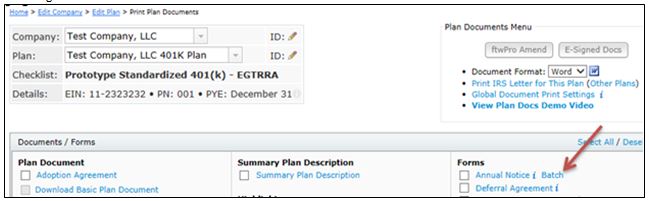
You can also access the applicable feature(s) by clicking on the "Batch" link located in the "Forms" box on the "Print Plan Documents" page just to the right of the applicable link. For example, for a plan with Annual Notice features (safe harbor, auto-enrollment or QACA) to the right of the Annual Notice link; for welfare plans subject to HIPAA Portability, to the right of the SBC - Annual link.
PPA Restatement
The PPA Restatement Batch allows the user to convert EGTRRA plans to PPA. Once converted to PPA, the user is able to print the Restatement, along with a Cover Letter, Basic Plan Document (BPD), if applicable, Summary Plan Description (SPD) and Participant Highlights.
The PPA Restatement Batch can also be used to update plans that were restated for PPA prior to February 22, 2015. This can be done either by creating an entirely new set of documents (either reposting or regenerating the original PPA Restatement or creating a new PPA Restatement batch) or by creating an amendment batch (2015 IRS Update Amendment). The amendment option is only available for prototype documents and those Volume Submitter documents using the prototype format.
Click here to view a demo video of the PPA Restatement.
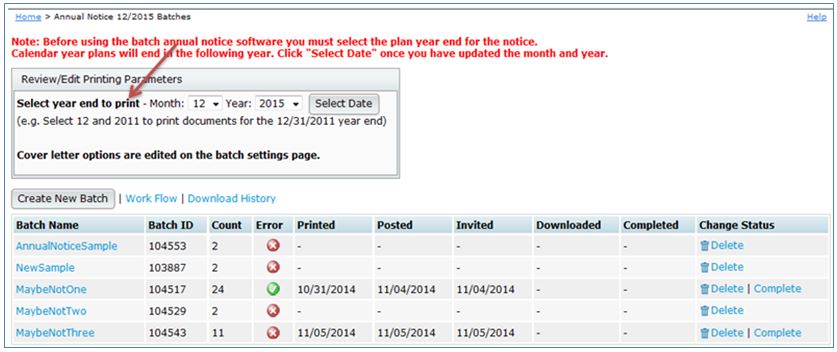
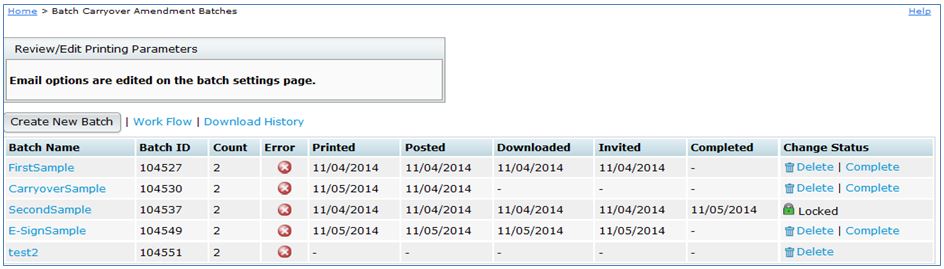
Existing Batches.
The image below shows sample batches already added.

A batch that has an 'OK' ( ) Error status means that all edit checks in the plan checklist and batch grid have passed. The
  symbol means there are errors either with one or more of the document checklist(s) or with the batch grid. Click on the to see the checklist and/or grid errors.
Users can "Complete" a batch at any time. If a batch is completed, it will appear as having a "Locked" status and Completed column will have a date stamp with the date the batch was marked as "Complete". If a user wishes to edit, resend or delete a "Locked" batch, they will first need to "Unlock" the batch by pressing the "Unlock" link under Change Status. If the user wishes to delete the batch, they can simply click the "Delete" link under the Change Status column. To edit an unlocked batch click on the name of the batch link.
Work Flow. By clicking on "Work Flow", the user will see a list of all of the Defined Contribution plans set up in the system that have "Yes" for "Resp" for the Plan Documents, whether they are EGTRRA or PPA. You can also view which plans have "Yes" for "Resp" for the Plan Documents (plans marked "No" under "Resp" will not be available to add to the batch).
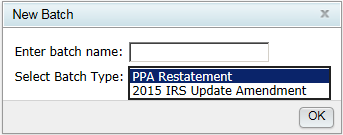
Create New Batch. Click on "Create New Batch" to start the process of completing a PPA Restatement Batch or 2015 IRS Update Amendment Batch.
Batch Options (before PPA conversion):
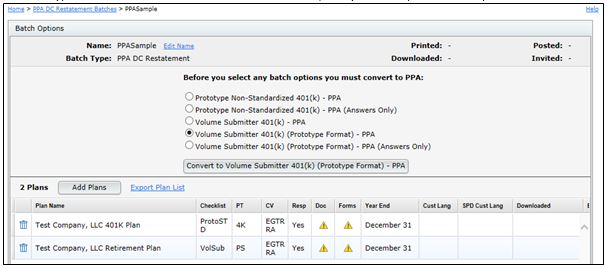
Add Plans. Once directed to the "Batch Options" screen, click on "Add Plans", where a list of plans that are not currently in another PPA Restatement batch will display (and are marked as "Yes" for "Resp"). The user will be able to select EGTRRA or PPA checklist types. To add plans to the batch, the user would check the box on the left-hand side of "Plan Name" to select/unselect all the plans listed, or check off plans one at a time. When the plans are selected, click on "Add Plans".

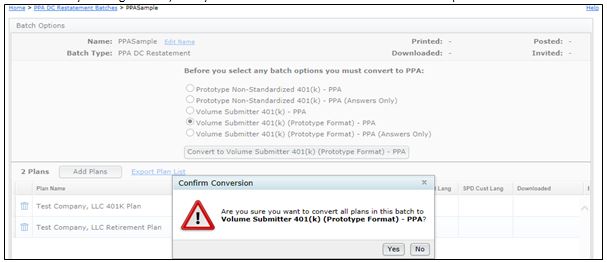
The user will be directed back to the "Batch Options" screen where the option to choose the PPA Checklist type will appear. Once selected, the user will click on "Convert to [Checklist Type] – PPA". Note: If the user adds plans to the batch that have already been converted to PPA for the SAME checklist type that is being converted, the system will not perform any updates to that plan. However, if the user adds PPA plans that are on DIFFERENT checklist types from what has been selected for conversion, the system will perform the updates.
Once the user clicks on "Convert to [Checklist Type] – PPA", a warning dialog will appear for the user to Confirm Conversion. By clicking on "No", the system will direct the user back to the "Batch Options" screen.
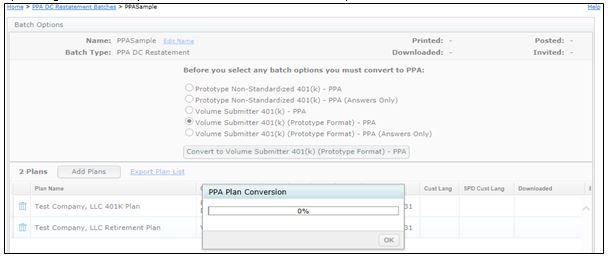
By clicking on "Yes" the system will run the PPA Conversion and provide a PPA Plan Conversion statistic.
Batch Options (after PPA conversion):
Once the plans in the batch have been converted to PPA, numerous options will appear on the "Batch Options" screen. Each will be discussed in the order they appear below.

Edit Name. The user may click on this link to re-name the batch.
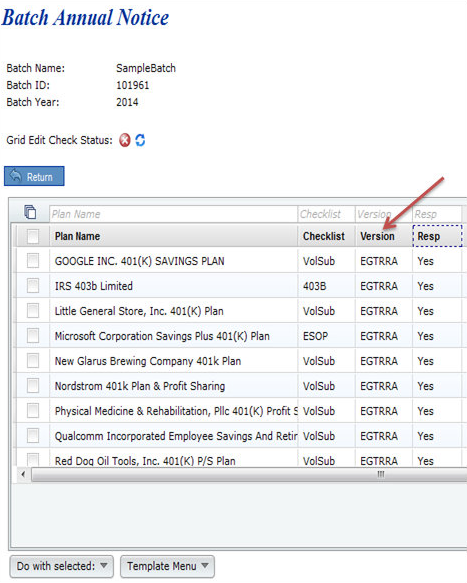
Work with Batch Grid. Instead of going directly to a plan's "Edit Plan" screen to work on the checklist, the user can go into the "Work with Batch Grid" to update some of the checklist items. The user is able to directly change checklist items within the grid, which will update the Online Checklist found on the Edit Plan screen. For more details on which columns may be edited, view the "Batch Grid Data Entry Key".
Do With Selected. This feature allows you to "Change columns" for plans selected.
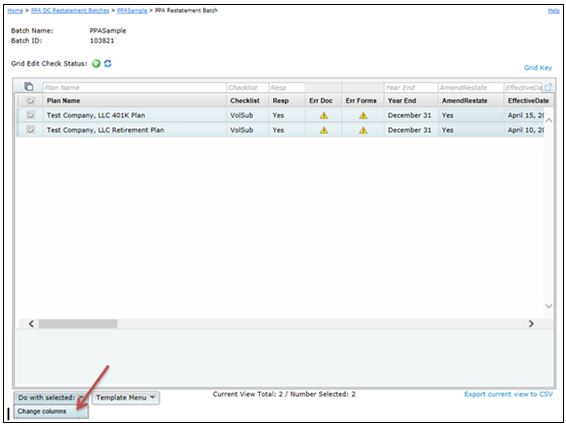
Change columns. Allows admin users to update the AmendRestate, EffectiveDate, Forfeitures, ForfeituresText, DeathBenefits, DeathBenefitsCustom, BeneDivorceRevokeIND, BeneDivorceRevoke, DomestPartners, DomestPartnersLimits, DomestPartnersMods, DomestPartnersModsText, SpouseOneYear, TransferJS, TransferAge62, TransferAge62Conditions, DisabilityDistributions, InservLimits, InservLimitsText, InPlanRothRollover, InPlanRothRolloverOther, InPlanRothRolloverAge, InPlanRothRolloverPartVested, InPlanRothRolloverEffDate, InPlanRothRollover411, InPlanRothRollover411Other, IRRNotDistributable, IRRNotDistributableLimits, IRRNotDistributableEffDate, SpecialTrustee, SpecialTrusteeOther, SttLimit, SttLimitPeriod, SignaturePages columns by checking the box for the column to un-gray the fields. The user will find more details on what each column represents by going to the "Batch Grid Data Entry Key" with the "Grid Key".
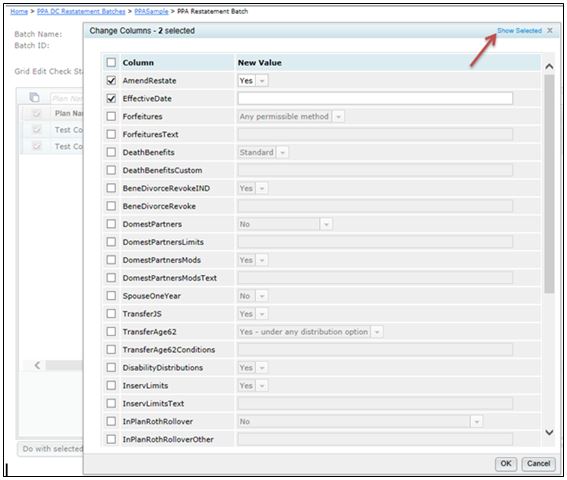
Show Selected. Displays the plans that were selected on the "Batch Options" screen.
Default Template: Master and Designated Admin user will start off with a Default Template and have the option to create a new template for all users to view. For more details about the Templates, view Template Menu below.
The grid options that appear for all users will depend upon what template is selected by the admin user(s). If users do not see one of the columns described under "Change columns", the admin user has likely selected a different template for its users. You may click on "Batch Grid Data Entry Key" for more details.
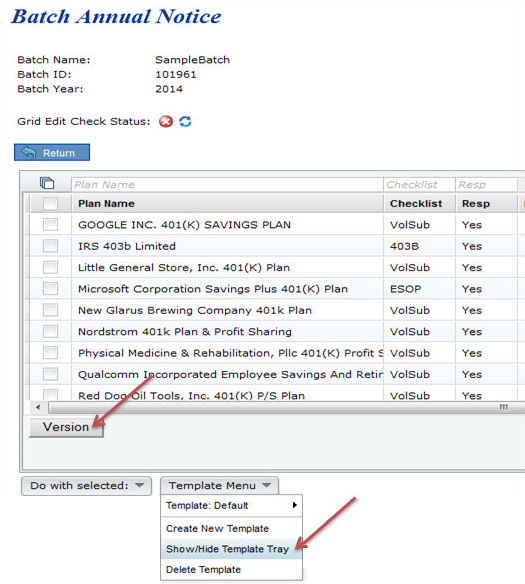
Template Menu. Master/Designated Admin users may make changes to the Default Template grid, or create a new template grid. This menu has three options (Create New Template, Show/Hide Template Tray and Delete Template) described in detail below:
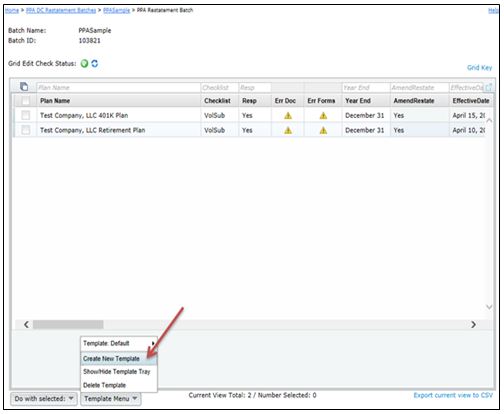
Create New Template. Create a template, which will replicate the Default and select it from the Template drop-down list. Use only letters, numbers, spaces and dashes to create templates. Once created, you will need to select the new template from the Template drop-down list before you can edit it under the "Show/Hide Template Tray" option described below (or delete it).
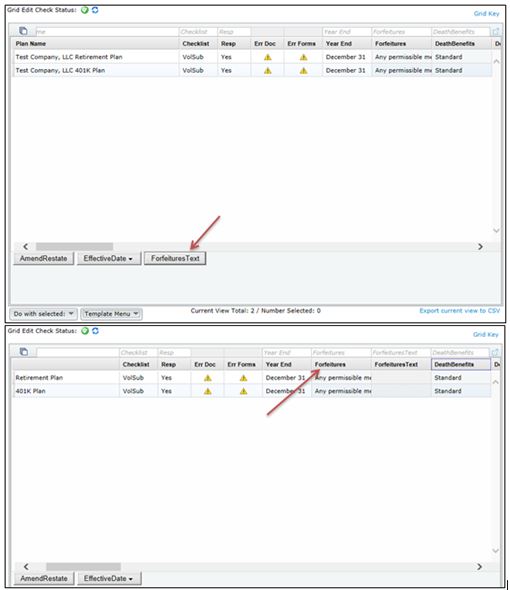
Show/Hide Template Tray. Customize the Default or any template created. First, the user should ensure the template is selected and then select the "Show/Hide Template Tray".
Add column headers by clicking on the header in the tray. Note that headers will be added in the default order. Remove column headers by dragging them into the tray.
Delete Template. Delete the template that is currently displayed on the "Template" button. Pop-Up window appears to confirm you are sure you would like to delete the template.
Export current view to CSV. Export a CSV file for the template you have selected.
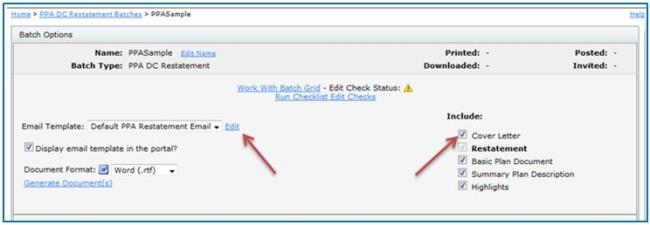
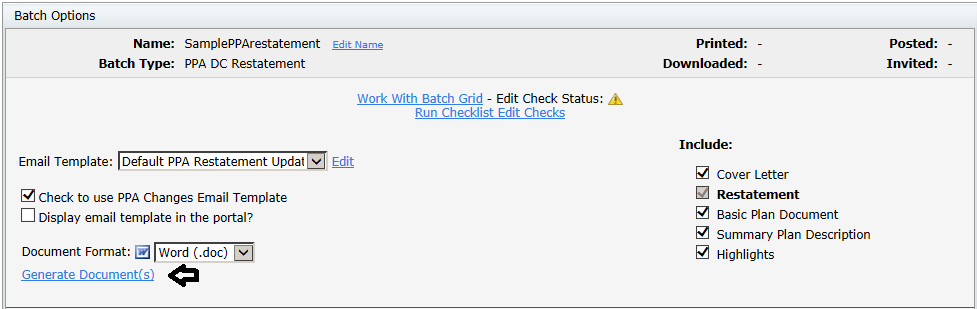
Include. The Restatement is auto-selected beneath 'Include' on the right-hand side of the screen. You are able to also select the Cover Letter, Basic Plan Document, if applicable, Summary Plan Description, and/or Highlights to print with the Restatement. After you have the documents selected that you wish to print, click on "Generate Selected Document(s)", which will create a zip folder containing a file for each plan within the batch. The "Printed" date will update in the upper right-hand corner once you click "OK" when generating the files.
If you are familiar with ftwPortal Pro, the Cover Letter is the same as the Email Template. To view more details on how to edit or clone email templates, click here to be directed to the Portal User Guide. Annual Document subscribers andftwPortal Pro customers can follow the same steps to set up the Cover Letter.
Delivery Method. Users that are a ftwPortal Pro customer have the option to publish the PPA Restatement to the portal, or provide a Direct-Link to the PPA Restatement so that users can auto-generate the Restatement without logging into the portal. First, the user will need to select Automatic Delivery from the drop-down list.
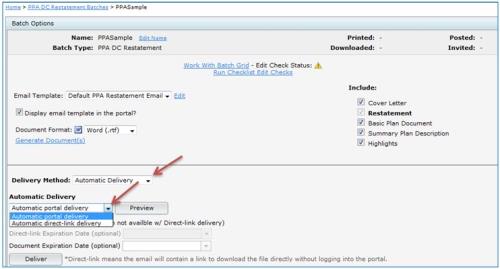
Automatic portal delivery. Select this option to send a link to portal users to log into the portal to view the Restatement and supporting documents, if applicable.
Automatic direct link delivery. Select this option to send a direct-link to portal users to easily download a copy of the Restatement and supporting documents, if applicable, without having to log into the portal.
Note. Users should be sure to click on "Preview" to ensure that portal users are assigned to the plans, and to verify that the correct placeholders are used within the email templates before sending the invites to your clients. To view more details on how to edit or clone email templates, click here to be directed to the Portal User Guide.
E-Sign:
ftwPortal Pro customers that have reviewed the E-Signature Whitepaper and emailed the completed E-Signature Authorization Form to support@ftwilliam.com will have access to use the E-Sign option for the Batch PPA Restatement. This feature is an add-on product to ftwPortal Pro at no additional cost.
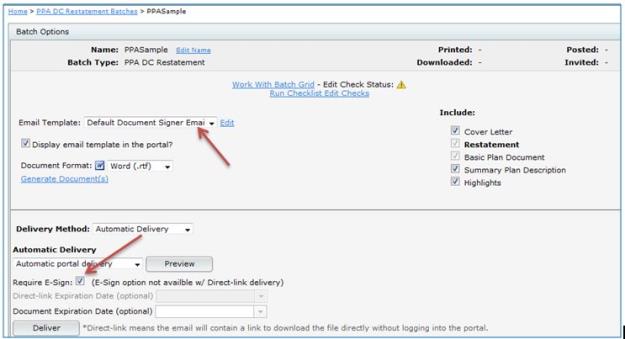
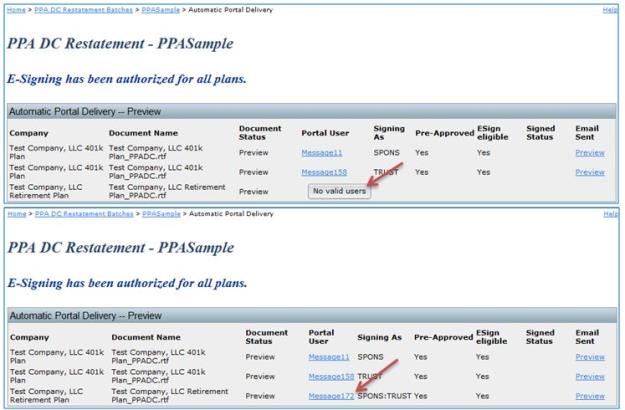
Once users have E-Sign turned on, the option will become visible to the user after selecting Automatic Delivery, then Automatic portal delivery. Note: E-Sign is not an option with Direct-Link. After E-Sign is checked, the Email Template will also update to the default email template selected in the Global Email Settings for Document Signer Email. Users should click on "Preview" to verify signers have been set up for each plan listed in the batch. Click on "No valid users" to add a signer to the plan. Each plan can only have one Sponsor, but as many Trustees as desired.
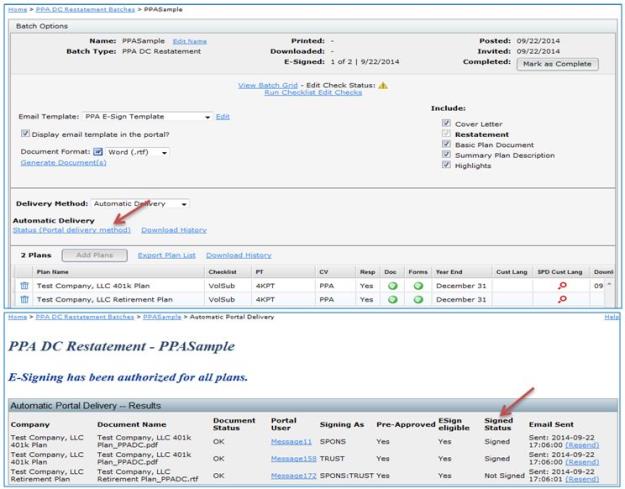
Users should return back to the Batch Options screen to click on Deliver. All the files that were "Included" will publish to the portal as one file for the portal users to E-Sign in .pdf format, even if it was sent to the portal in .rtf format. Once the file has been E-Signed, the signatures will insert into the signature line(s) of the Adoption Agreement/Plan Document. Users can verify the status of the plan by going to the "Status (Portal delivery method)" to view the Signed Status.
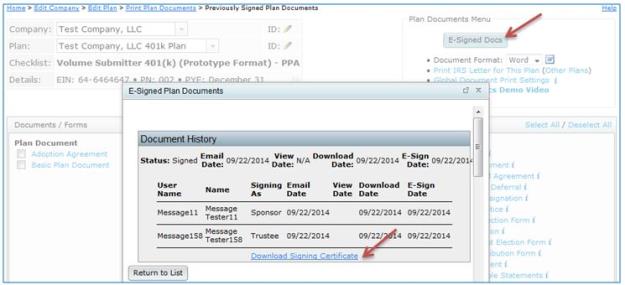
The user can go to the Print Plan Document screen for a given plan to view the E-Signed Adoption Agreement/Plan Document, as well as the Certificate.
Note: Batches that contain E-Signed Documents may be deleted. However, please note the following:
- If a document in the batch was fully signed, that is, all required signers e-signed the document on the portal, the original e-signed document will remain on the portal user's portal page so the history is retained.
- If a document was only partially e-signed, that is, multiple signers were required to sign and not all did, the document will be deleted from the portal.
- If a document in the batch was not e-signed, the document will be deleted from the portal.
Regenerating a Restatement Batch.
Plans that were already restated for PPA prior to February 22, 2015 using the PPA Restatement batch feature, can be reprinted to produce new documents with the required changes that can then be manually printed and sent to your clients.
From the PPA Restatement Batch screen, click the link under the "Batch Name" of the batch that will be reprinted.

After making any changes to the document format or documents to include in the batch, simply press the "Generate Document(s)" button to produce a zip folder with all of the selected documents in the batch.
Reposting a Restatement Batch. Plans that were already restated for PPA prior to February 22, 2015 using the PPA Restatement batch feature, can be reposted to produce new documents with the required changes and automatically deliver them to their client's portal.
First, from the PPA Restatement Batch screen, click the link under the "Batch Name" of the batch that needs to be reposted. The batch must have an unlocked status in order for the "Repost" button to be available.
Next, set the Delivery Method to Automatic Delivery. The screen will refresh and the "Repost" button will appear. Pressing the "Repost" button posts the newest version of the documents to the portal.

Once returned to the batch restatement, verify that the settings are as you wish them to be and press the "Deliver" button to require e-signing or enable direct-link delivery.
Click here to view a demo video of the PPA Restatement process.
2015 IRS Update Amendment Batch.
Prototype plans that were already restated for PPA prior to February 22, 2015 using the PPA Restatement batch feature, can elect to produce the 2015 IRS Update Amendment instead of generating entirely new documents. This feature is accessed from within Batches --> PPA Restatement.
First, users will need to create a new batch. To do this, click the "Create New Batch" button --> Enter batch name-> Select batch type to be "2015 IRS Update Amendment" and press OK.
Next, click the "Add Plans" button and select the plans you would like to add to your batch. Please note that individually designed plans (IDPs) are not able to be added to a 2015 IRS Update Amendment batch, as these plans must be fully restated. Once all plans you wish to include in this batch have been selected, press the "Add Plans" button.
The user will be directed back to the "Batch Options" screen where the option to choose the PPA Checklist type will appear. Once selected, the user will click on "Convert to [Checklist Type] – PPA". Note: If the user adds plans to the batch that have already been converted to PPA for the SAME checklist type that is being converted, the system will not perform any updates to that plan. However, if the user adds PPA plans that are on DIFFERENT checklist types from what has been selected for conversion, the system will perform the updates needed to convert the plan to the new document type.
Prior to generating the amendment, the user should run the checklist edit checks. This will run edit checks for all plans in the batch. All issues in each plan should be resolved within the specific plan's checklist prior to continuing on.
The e-mail template should then be selected. The "E-mail Template" is the same as the "Cover Letter" if you elect to print the cover letter when printing your documents or are publishing to the portal if you use ftwPortal Pro. The document selection is located on the right side of the screen. Check the documents that you would like to print (or publish to the portal if you use ftwPortal Pro). The Amendment and Basic Plan Document will automatically be checked and cannot be un-selected as these are both required to be printed.

After all selections have been made, the user will either press the Generate Document(s) link to download the amendment packages to a zip folder or can use the Automatic Delivery method to post the amendment to the portal.
Click here to view a demo video of the PPA Amendment process.
Annual Notice
Select year end to print. First, select the plan year end you want to work with under the 'Edit Printing Parameters' box. Click "Select Date" to select/update the plan year end shown.
Work Flow By clicking on "Work Flow", the user will see a list of all of the plans set up in the system that have "Yes" for "Resp" for the Plan Documents, whether they are EGTRRA or PPA, and that have Safe Harbor, Nonelective, QACA and/or QDIA (plans marked "No" under "Resp" will not be available to add to the batch).
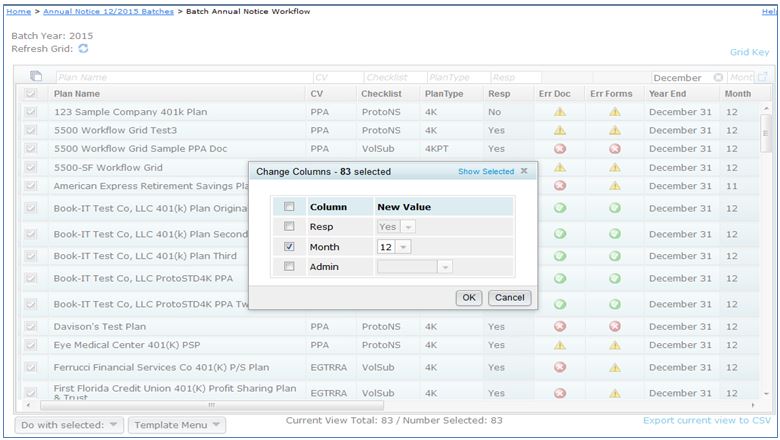
Note: Click on "Work Flow" before adding a batch to verify that each plan has a 'Month' selected. Oonly those plans that have a 'Month' selected in the 'Month' column will appear in the user's 'Add Plans' list. If the 'Month' column is not completed, the user can sort the 'Year End' column by entering December, for example. When the user clicks on 'Enter' the list will narrow down to those plans that have a December 'Year End'. Then, the user can check the box to the right of the 'Plan Name' and click on 'Do with selected', then 'Change columns'. This will allow the user to check the box for 'Month' and click 'OK' after a New Value has been selected to update the selected plan's 'Month' column.
Download History. If the user has ftwPortal, then the user can click on 'Download History' to view when portal users have downloaded the Annual Notice from the portal, if published to the portal.
Create New Batch. Click on "Create New Batch" for the Year End selected above. Note that you can always delete a batch and/or add/remove plans to a batch up until the batch has been marked as 'Completed'. Once a batch has been printed and the Error status is 'OK' (
), you will have the option to mark the batch as 'Complete' from this page. The symbol means there are errors either with one or more of the document checklist(s) or with the Work With Batch grid. Click on the
to see the checklist and/or grid errors.
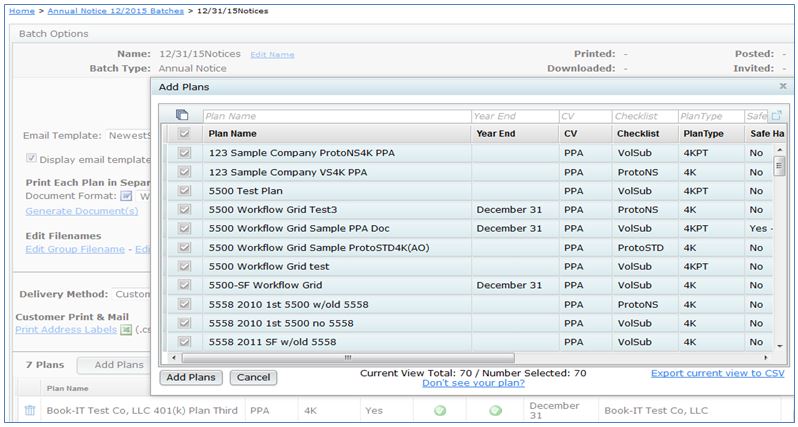
Add Plans. After creating a new batch, the user will be directed to the "Batch Options" screen. The user will need to click on "Add Plans", where a list of plans for the Year End that are not currently in another batch will display.The user can check the box on the left-hand side of 'Plan Name' to select/unselect all the plans listed, check off plans one at a time and/or use the filters to narrow down the plans before selecting. Click on "Add Plans" once the desired plans have been selected.
Note: Both EGTRRA and PPA plans may be added to the batch. PPA plans have the option in the plan checklist to select the Safe Harbor Maybe Not language; however, EGTRRA plans will only have the option through the Work With Batch Grid. See below for more details.
Edit Batch Screen. Once plans have been added to a batch, numerous options will appear on this screen. Each will be discussed in the order they appear below.
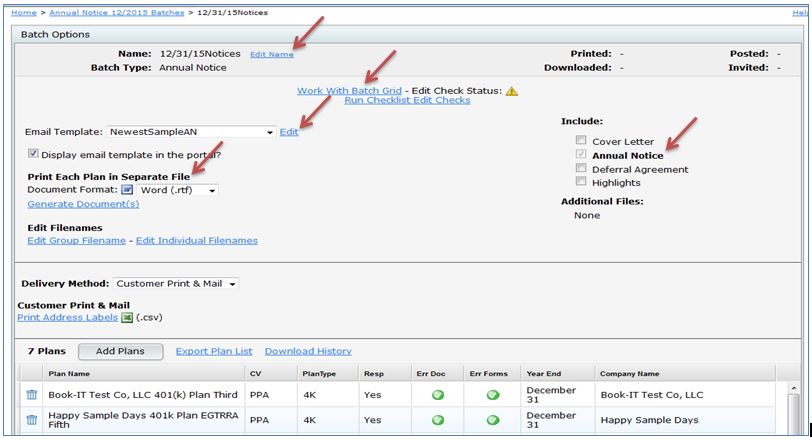
- Edit Name. Users may click on this link to re-name the batch.
- Include. The Annual Notice is auto-selected beneath 'Include' on the right-hand side of the screen. Users are able to also select the Cover Letter, Deferral Agreement and/or Highlights to print with the Annual Notice. After the documents are selected to print, click on "Generate Selected Document(s)" for 'Print Each Plan in Separate File', which will create a zip folder containing a separate folder for each plan within the batch. The 'Printed' date will update in the upper right-hand corner once the user clicks 'OK' when generating the files. Note: The 'Print All Plans in One File - MS Word', which generated one file for all the plans within the batch has been disabled due to the batch allowing both EGTRRA and PPA plans.
Edit (Email Template): Users familiar with ftwPortal Pro, the Cover Letter is the same as the Email Template. To view more details on how to edit or clone email templates, click here to be directed to the Portal User Guide. Annual Document subscribers and ftwPortal Pro customers should follow the same steps to set up the Cover Letter.
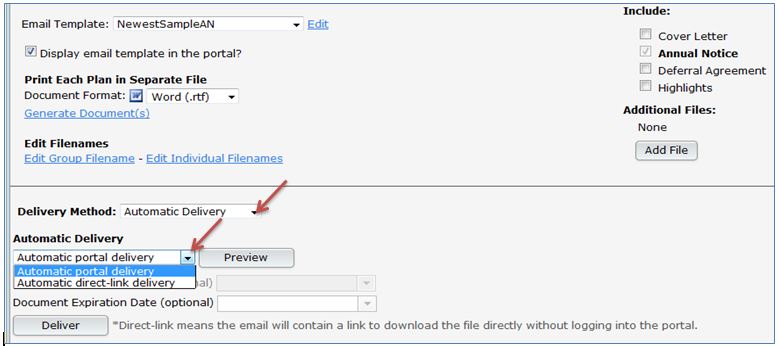
Delivery Method Users that have ftwPortal Pro, have the option to publish the Annual Notice to the portal, or provide a Direct-Link to the Annual Notice so that portal users can auto-generate the Annual Notice without logging into the portal. First, users will need to select Automatic Delivery from the drop-down list. - Automatic portal delivery. Select this option to send a link to portal users to log into the portal to view the Annual Notice and supporting documents, if applicable.
- Automatic direct link delivery. Select this option to send a direct-link to portal users to easily download a copy of the Annual Notice and supporting documents, if applicable, without having to log into the portal.
Note. Be sure to click on "Preview" to ensure that portal users have been assigned to the plans, and to verify that the correct placeholders are within the email templates before sending the invites to your clients. To view more details on how to edit or clone email templates, click here to be directed to the Portal User Guide.
Work with Batch Grid.
Default Template: Master and Designated Admins will start off with a Default Template.
The grid options that appear for all users will depend upon what template is selected by the admin user(s) at the bottom of the 'Batch Annual Notice' screen. Users may click on "Grid Key" to view the '
Batch Grid Data Entry Key' for more details.
Users that have both EGTRRA and PPA plans will have the option to set up Safe Harbor Maybe Not language by going to the Work with Batch Grid. Note: EGTRRA plans will automatically highlight red until the "Maybe SH" column has been completed. EGTRRA plans do not have the option to update the online checklist; therefore, ftwilliam.com developed a way to add the text within the grid. PPA plans do have the option to select the Maybe Not language within the online checklist, but can also update the "Maybe SH" option within the grid.
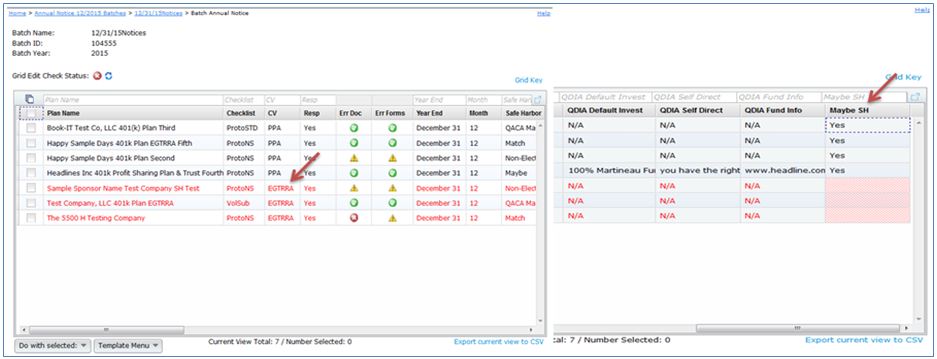
For EGTRRA plans, if the "Maybe SH" option is Yes, the following text will appear within the Annual Notice:
The plan may be amended during the plan year to reduce or suspend safe harbor nonelective contributions. The reduction or suspension will not apply until at least 30 days after you are provided notice of the reduction or suspension.
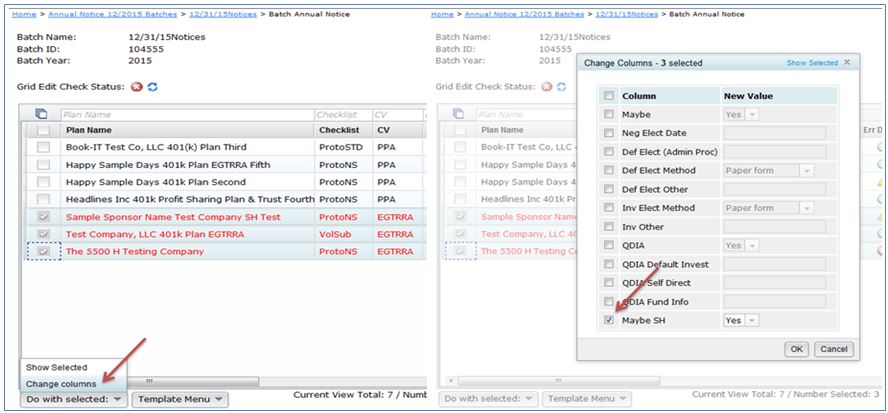
- Do With Selected. This feature allows users to view/update plans selected.
- Show Selected. Displays the plans that were checked.
- Change a Column. Allows admin users to update the Maybe, Neg Elect Date, Def Elect (Admin Proc), Def Elect Method, Def Elect Other, Inv Elect Method, Inv Other, QDIA, QDIA Default Invest, QDIA Self Direct, QDIA Fund Info and/or Maybe SH columns. First, the user will need to select the applicable plans and then click on Do with selected.
- Create New Template (create a template, which will replicate the Default and select it from the Template drop-down list)
- Use only letters, numbers, spaces and dashes to create templates.
- Once created, you will need to select that template from the Template drop-down list before you can edit it under the 'Show/Hide Template Tray' option described below (or delete it).
- Use only letters, numbers, spaces and dashes to create templates.
- Show/Hide Template Tray (customize the Default or any template created). First ensure the template you want to work on is selected and then click to 'Show/Hide Template Tray'.
- Add column headers by clicking on the header in the tray. Note that headers will be added in the default order.
- Remove column headers by dragging them into the tray.
- Add column headers by clicking on the header in the tray. Note that headers will be added in the default order.
- Delete Template
- Deletes the template that is currently displayed on the Template button.
- Pop-Up window appears to confirm you are sure you would like to delete the template.
- Deletes the template that is currently displayed on the Template button.
- Export current view to CSV
- Export a CSV file for the template you have selected.
Template Menu. You may make changes to the Default template grid, or create a new template grid. This menu has three options (Create New Template, Show/Hide Template Tray and Delete Template) described in detail below:
Batch Carryover Amendment
The Batch Carryover Amendment allows users to quickly create the Carryover/Election Amendment for Cafeteria and Premium Only Plans (POP). Once the batch is created, users are able to print the Amendment (includes the Consent, SMM and Amendment), along with a Cover Letter, in One File for all plans, or in a Zip folder.
Work Flow. By clicking on "Work Flow", the user will see a list of all of the Welfare plans set up in the system under a Cafeteria or POP checklist for the Plan Documents. Users will also be able to view which plans have "Yes" for "Resp" for the Plan Documents (plans marked "No" under "Resp" will not be available to add to the batch).
Create New Batch. Click on "Create New Batch" to start the process of completing a Batch Carryover Amendment. The sample image above shows a sample batch already added. Note that you can always delete a batch up until the batch is marked as 'completed'. Once a batch has been printed and the Error status is 'OK' (), you will have the option to mark the batch as 'Complete' from this page. The symbol means there are errors either with one or more of the document checklist(s) or with the batch grid. Click on the to see the checklist and/or grid errors.
Batch Options:
Once plans in the batch have been added, numerous options will appear on the "Batch Options" screen. Each will be discussed in the order they appear below.
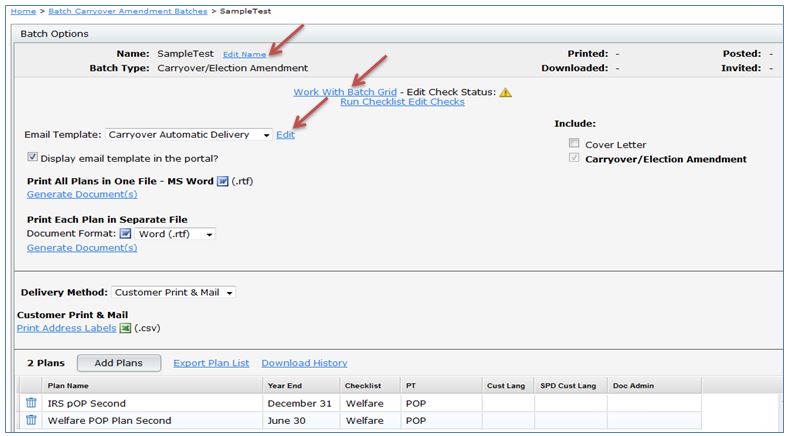
Edit Name. The user may click on this link to re-name the batch.
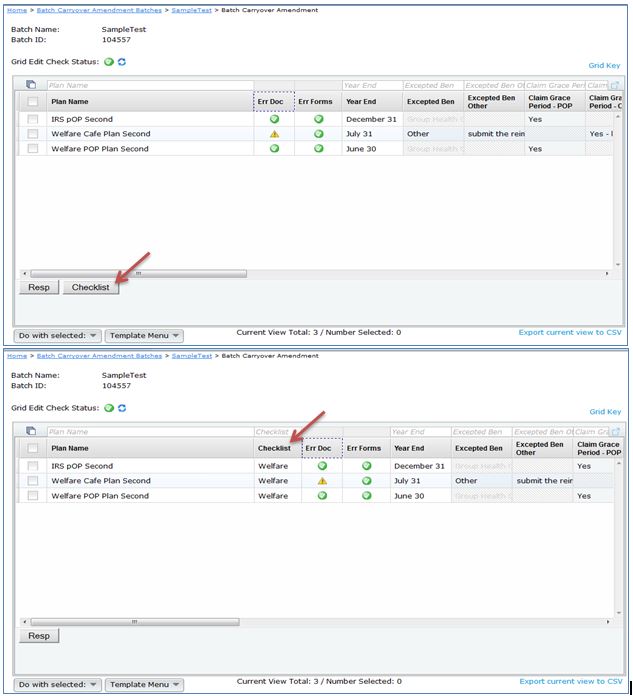
Work with Batch Grid. Instead of going directly to a plan's "Edit Plan" screen to work on the checklist, the user can go into the "Work with Batch Grid" to update some of the checklist items. The user is able to directly change checklist items within the grid, which will update the Online Checklist found on the Edit Plan screen. For more details on which columns may be edited, view the "Batch Grid Data Entry Key".
Do With Selected. This feature allows you to "Change columns" for plans selected.
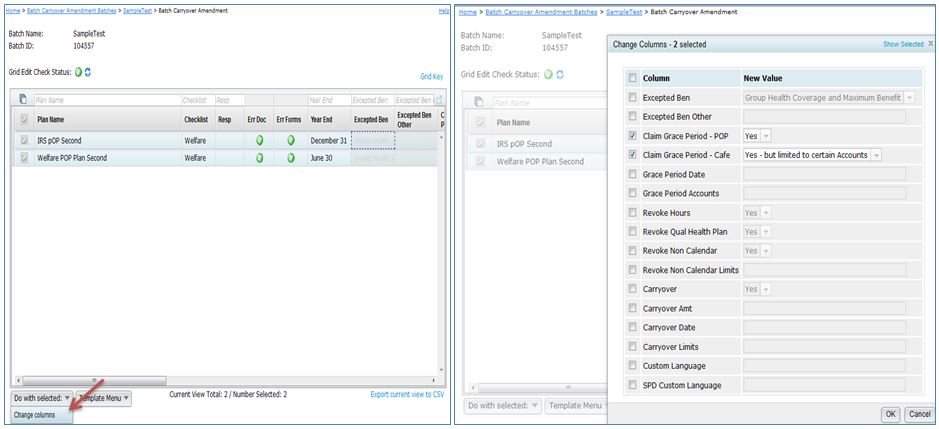
- Change columns. Allows admin users to update the Expected Ben, Expected Ben Other, Claim Grace Period - POP, Claim Grace Period - Cafe, Grace Period Date, Grace Period Accounts, Revoke Hours, Revoke Qual Health Plan, Revoke Non Calendar, Revoke Non Calendar Limits, Carryover, Carryover Amt, Carryover Date, Carryover Limits, Custom Language and Custom Language SPD columns by checking the box for the column to un-gray the fields. The user will find more details on what each column represents by going to the "Batch Grid Data Entry Key" with the "Grid Key".
Default Template: Master and Designated Admin user will start off with a Default Template and have the option to create a new template for all users to view. For more details about the Templates, view Template Menu below.
The grid options that appear for all users will depend upon what template is selected by the admin user(s). If users do not see one of the columns described under "Change columns", the admin user has likely selected a different template for its users. You may click on "Batch Grid Data Entry Key" for more details.
Template Menu. Master/Designated Admin users may make changes to the Default Template grid, or create a new template grid. This menu has three options (Create New Template, Show/Hide Template Tray and Delete Template) described in detail below:

Create New Template. Create a template, which will replicate the Default and select it from the Template drop-down list. Use only letters, numbers, spaces and dashes to create templates. Once created, you will need to select the new template from the Template drop-down list before you can edit it under the "Show/Hide Template Tray" option described below (or delete it).
Show/Hide Template Tray. Customize the Default or any template created. First, the user should ensure the template is selected and then select the "Show/Hide Template Tray".
Add column headers by clicking on the header in the tray. Note that headers will be added in the default order. Remove column headers by dragging them into the tray.
Delete Template. Delete the template that is currently displayed on the "Template" button. Pop-Up window appears to confirm you are sure you would like to delete the template.
Export current view to CSV. Export a CSV file for the template you have selected.
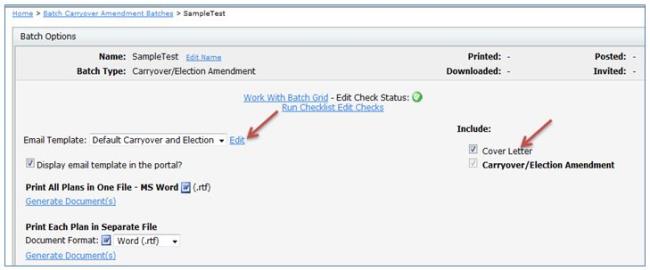
Include. The Amendment is auto-selected beneath 'Include' on the right-hand side of the screen. The user is also able to select the Cover Letter to print with the Amendment.
Print All Plans in One File - MS Word. After the user has the documents selected to print, the user would click on "Generate Selected Document(s)", which will generate a single file containing the Amendment for each plan within the batch. The "Printed" date will update in the upper right-hand corner once you click "OK" when generating the files.
Print Each Plan in Separate File. After the user has the documents selected to print, the user would click on "Generate Selected Document(s)", which will create a zip folder containing the amendment for each plan within the batch. The "Printed" date will update in the upper right-hand corner once you click "OK" when generating the files.
For users that are familiar with ftwPortal Pro, the Cover Letter is the same as the Email Template. To view more details on how to edit or clone email templates, click here to be directed to the Portal User Guide. Annual Document subscribers andftwPortal Pro customers can follow the same steps to set up the Cover Letter.
Delivery Method. Users that are a ftwPortal Pro customer have the option to publish the Amendment to the portal, or provide a Direct-Link to the Amendment so that users can auto-generate the Amendment without logging into the portal. First, the user will need to select Automatic Delivery from the drop-down list.
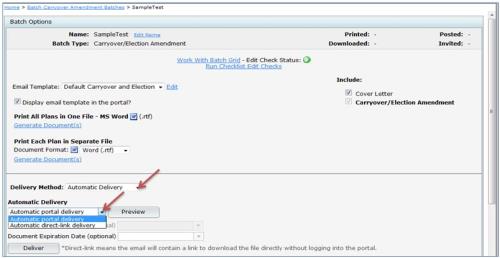
Automatic Delivery:
Automatic portal delivery. Select this option to send a link to portal users to log into the portal to view the Amendment.
Automatic direct link delivery. Select this option to send a direct-link to portal users to easily download a copy of the Amendment without having to log into the portal.
Note. Users should be sure to click on "Preview" to ensure that portal users are assigned to the plans, and to verify that the correct placeholders are used within the email templates before sending the invites to your clients. To view more details on how to edit or clone email templates, click here to be directed to the Portal User Guide.
Batch Welfare SBC
The Welfare SBC email text is currently only used for portal subscribers. The Welfare SBC batch currently does not allow printing a cover letter. The cover letter language can be used as a model if it is helpful but the system will not generate cover letters at this time. To view more details on how to edit or clone email templates, click here to be directed to the Portal User Guide.
Create New Batch. On the 'Show Batches' page, under the 'Current Batches' box, click on the button "Create New Batch". Enter a name for the batch and click "Create New Batch". You will then be taken to a screen below where you can select the plans to include in your batch. Note that you can always delete a batch and/or add/remove plans to a batch up until the batch is marked as 'completed'. Once a batch has been printed and the Error status is 'OK' (
), you will have the option to mark the batch as 'Complete' from this page. The symbol
means there are errors either with one or more of the document checklist(s) or with the batch grid. Click on the
to see the checklist and/or grid errors.
Add Plans. Once directed to the "Edit Batch" screen, click on "Add Plans", where a list of plans that are not currently in another batch will display. You can check the box on the left-hand side of 'Plan Name' to select/unselect all the plans listed, or you can check of those plans that you would like in your batch one at a time. When the plans are selected, click on "Add Plans".
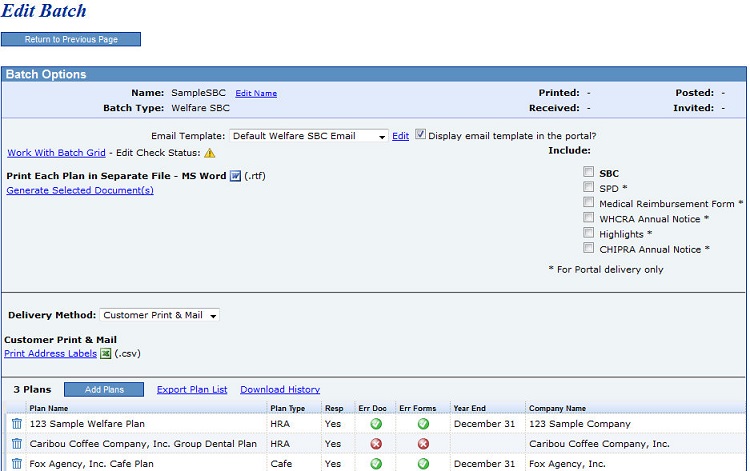
Print Notices and Review/Edit Plan Specifications. Once you have plans added to a batch, you can review the plan specifications relevant to the SBC and edit certain plan specifications in batch format. Click on the batch you want to edit and the 'Edit Batch' page will appear (see image above).
Click on 'Work with Grid' and a grid will appear with the plans in the current batch and it will display checklist items relevant to the SBC. If a field is editable, you will see a down arrow for drop-boxes and if you click inside the field and begin typing without errors when you leave the field, you can directly edit that field on the grid (changes will show in corresponding document checklist items). You can see more detail about each column and whether it is editable in the " Batch Data Entry Grid Key".
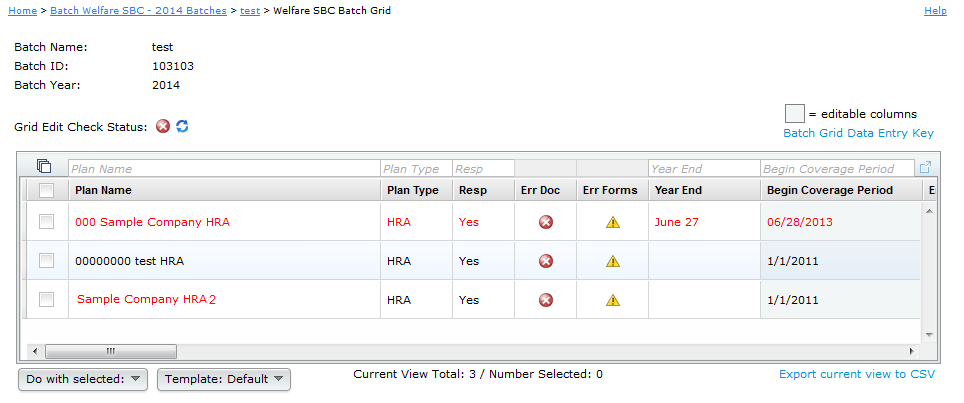
There is only one Print Option one the Batch Menu page for the Batch SBC; 'Print Each Plan in a Separate File - MS Word'. This will only generat the SBC in bold under 'Include'. To view more details on how to post batches to the portal, click here to be directed to the Portal User Guide.