1099 Software User Guide
  #
#
NOTE: This is intended to be a general guide to introduce you to the ftwilliam.com 1099 software features and structure. More details are often provided at ftwilliam.com and through free webinars preformed throughout the year. At the top of every screen after entering the 1099 software you will find a ‘Help’ link (where this guide appears) and a link to contact 'Support' (via email). You can also call (800) 596‐0714 or (414)226‐2442; phone lines are open Monday through Friday, 8 AM to 5 PM Central Time.
Table of Contents
| Section | Page Number |
| Section A. Overview: | 2 |
| • What’s Included in the Software | 2 |
| • Filing Methods | 2 |
| |
| Section B. Adding Payers | 2‐5 |
| • Getting Started | 2 |
| • Adding Payers via Manual Entry | 2‐3 |
| • Adding Payers via Upload | 4‐5 |
| |
| Section C. Adding Payees | 5‐9 |
| • Adding Payees via Manual Entry | 5‐6 |
| • Adding Payees via Upload | 6‐9 |
| Option 1 – Uploading 1099 Data from a spreadsheet that you create | 6‐7 |
| Option 2 ‐Generic XML File Upload | 8‐9 |
| |
| Section D. Running the Edit Checks | 9 |
| |
| Section E. Printing the Forms | 10‐11 |
| • Aligning Your Printer | 10 |
| • Printing Copies of Form 1096 | 10 |
| • Printing Copies of Form 1099 | 11 |
| |
| Section F. Form 945 | 11‐13 |
| • Adding Paid Preparers | 12 |
| • Preparing Form 945 | 12 |
| • Batch 945 Printing | 13 |
| |
| Section G. Other Reports | 14 |
| |
| Section H. E‐Filing and Batch Features | 14‐16 |
| • Filing via the FIRE system | 14 |
| • Using the ftwilliam.com Fulfillment Service | 15‐16 |
1099 Software User Guide #
Section A. Overview:
The 1099 Forms package provides customers the ability to simplify the burdensome task of preparing and filing 1099s and related forms. Our batch printing and upload features streamline the data entry and filing process while edit checking and context sensitive help ensure accuracy. For those customers who prefer not to do the filing and printing themselves, our Fulfillment Service (Service Bureau) is an excellent alternative.
What’s Included in the Software:
The ftwilliam.com 1099 software enables you to prepare, print and file the following:
Form 1096 ‐Annual Summary and Transmittal of U.S. Information Returns;
Form 1099‐R ‐Distributions from Pensions, Annuities, Retirement or Profit‐Sharing Plans, IRAs, Insurance Contracts,
etc;
Form 1099‐Misc ‐Miscellaneous Income;
Form 1099‐Div ‐Dividends and Distributions;
Form 5498 ‐IRA Contribution Information;
Form 945 ‐Annual Return of Withheld Federal Income Tax;
Form 945‐A ‐Annual Record of Federal Tax Liability; and
Form 945‐X ‐Adjusted Annual Return of Withheld Federal Income Tax or Claim for Refund.
Filing Methods:
| Form: | Recipient: | Method of Filing: | Type of Paper, if Applicable: |
|---|
| 1096 | Federal | Mail/E‐File | Red Federal Pre‐Printed |
| 1099‐R/Misc/Div/5498 Copy A | Federal | Mail/E‐File |
| 1099‐R Copy B/C/2 | Payee | Mail | Blank 3‐Up Perforated |
| 1099‐R/Misc Copy 1 | State | Mail/E‐File |
| 1099‐R Copy D | Payer | Mail |
| 1099‐Misc Copy B/2 | Payee | Mail |
| 1099‐Misc/Div/5498 Copy C | Payer | Mail |
| 1099‐Div/5498 Copy B | Payee | Mail |
| Form 945/945‐A/945‐X | Federal | Mail | Printer Paper |
Section B. Adding Payers
Getting Started
Select your company and plan. From the Edit/Print screen of the ftwilliam.com website, in the ‘Print Menu’ box, select the type of form you would like to work on (1099‐R, 1099‐Div, 1099‐Misc, or 5498), then select the year and click the ‘Go’ button. You are now on the main page of the website where you will prepare your 1099 filing.
• Caution! You should always make sure to have the Payers set up before you add Payees (Participants). Payers are generally identified by their Taxpayer Identification Number (TIN) and ftwilliam.com needs to be able to recognize the TIN to associate the Payees with the correct Payer. Please note that this may be the same as the Employer Identification Number (EIN),
1099 Software User Guide #
There are two methods you may use to add a Payer: manually or via upload.
Adding Payers via Manual Entry:
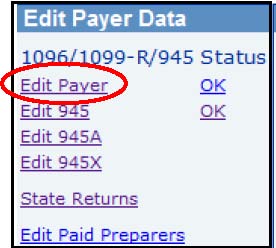
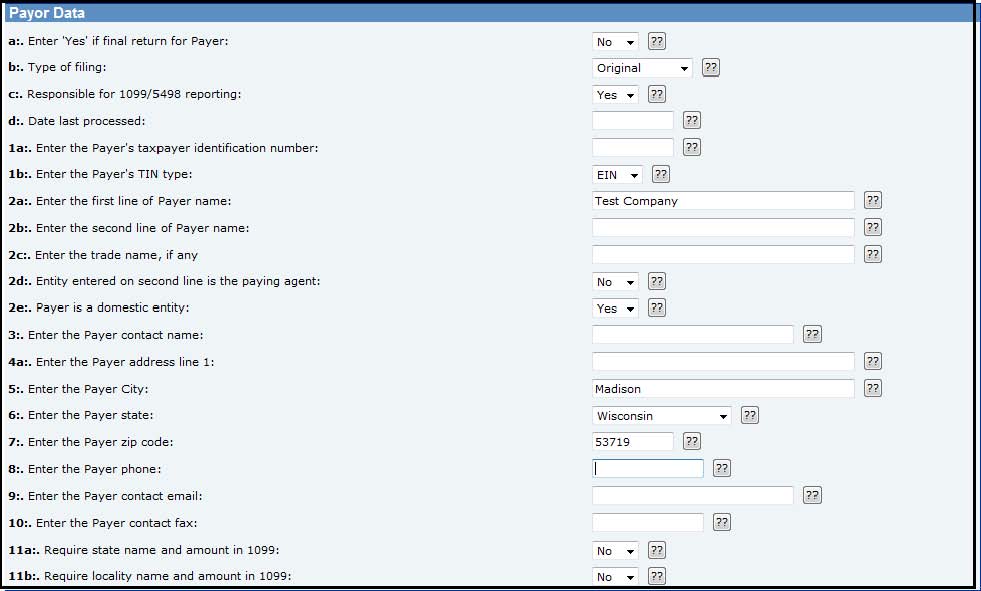
To add a payer manually, you will use the Edit Payer link under each plan you are preparing filings for. From the ‘Form 1099‐5498 – 2010’ screen, click on ‘Edit Payer’ in the ‘Edit Payer Data’ box.
Complete all of the fields and click ‘Update’ to save the entries; ‘Return’ will bring you back to the previous screen, but  will not save any changes. You may click on the help button
if you have questions regarding one of the fields.
1099 Software User Guide #
Adding Payers via Upload:
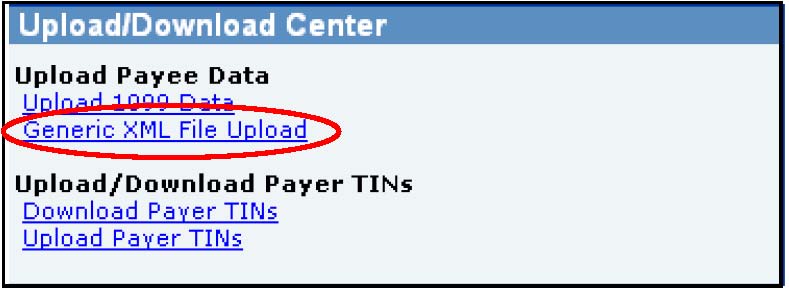
If you have a large number of Payers, you can add the Payers using the ‘Upload/Download Center’. To use this feature
works, you will:
Download a list of the plans you have set up on ftwilliam.com.
Edit the list to remove any plans you do not need to produce 1099s for ‐add the TINs and make any other
adjustments needed to the data
Upload the list to the 1099 software.
• Please note that if you do not have plans set up on ftwilliam.com you can send a list of the company EINs to support@ftwilliam.com and we will load them for you. We can download prior year form 5500 data from the Department of Labor – this will add the companies, and any plans for which 5500s were filed, to our system under your account. To make use of this free service, please send a spreadsheet with the company EINs via e–mail to support@ftwilliam.com, and include your Company Code.
Follow the steps below to complete the download, and upload of Payer TINs:
- Click on ‘Upload/Download Center’ within the ‘Print Menu’ box.
- Click the ‘Download Payer TINs’ link below ‘Upload/Download Payer TINs’. Save the file to your hard drive; it will save as a csv (comma separated value) file.
- Open the spreadsheet in csv format; you’ll see a listing of all the plans you have set up in ftwilliam.com. The first two columns are company and plan specific – do not alter these columns. The remaining columns are plan name, plan number and TIN.
- Go through the spreadsheet to delete the plans that you will not be completing 1099/5498s for.

5. Add the TINs; if any data, such as plan name, plan number or TIN is missing, add it to the spreadsheet and save. Please note that you may not add plans, so if there are plans missing from the list you should add them to the system manually as described on Page 3.
6. Once you have updated and saved the file, click on ‘Upload Payer TINs’.
1099 Software User Guide #
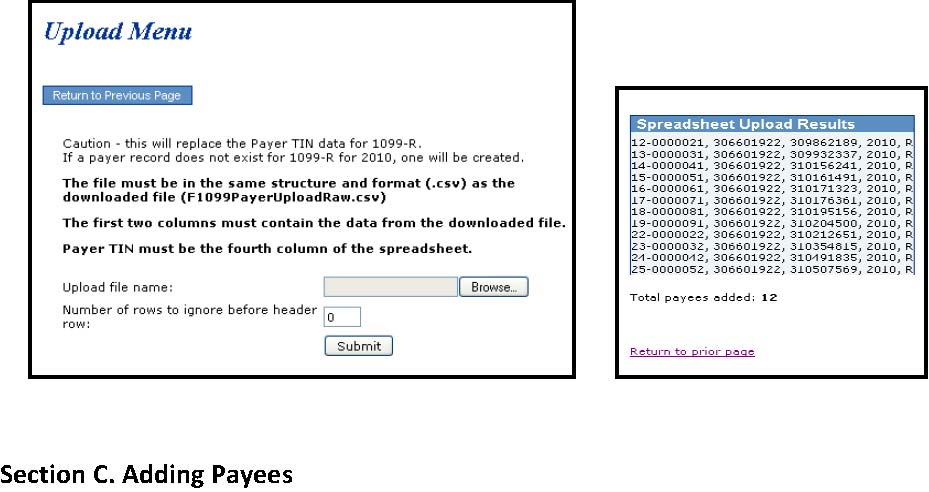
- You will be brought to the ‘Upload Menu’ screen where you will browse for your saved file. Enter the ‘Number of rows to ignore before Header Row’, if any. This will default to zero, as the Header Row will typically be the first row on your spreadsheet.
- Click ‘Submit’ to upload the file. The results will give you the total number of payers added – see the screen shot on the right, below.
Just as you added the payers, there are two methods you may use to add a payee: manually or via upload.
Adding Payees Manually:
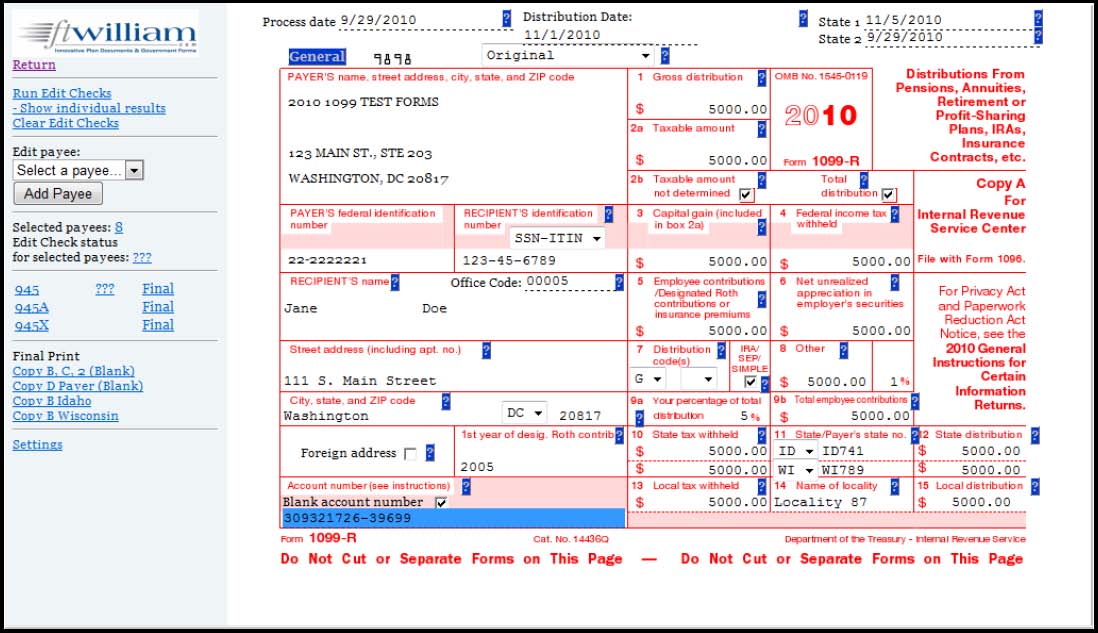
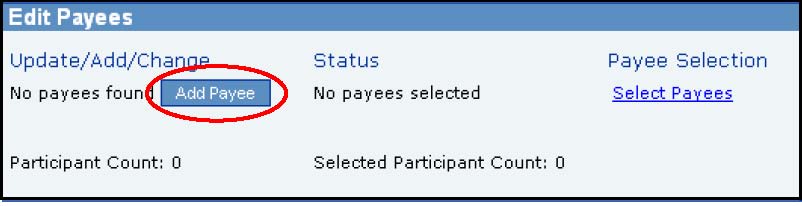
- When you are on the ‘Form 1099/5498 – 2010’ screen, you may add Payee data by clicking on the ‘Add Payee’ link within the ‘Edit Payees’ box.
- You will be prompted to enter a Payee’s First Name and Last Name. Then, click ‘Add Participant’. This will bring you to a draft Copy A for you to complete. From this screen you are able to run edit checks, add more Payees, go to the 945, 945‐A, 945‐X or even print non‐Federal final copies.
1099 Software User Guide #

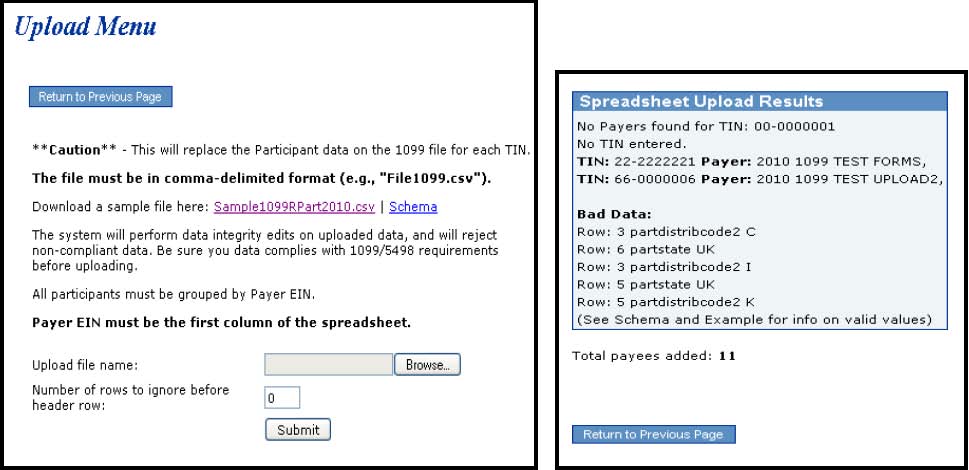
- From the Upload Menu below, click on ‘Sample1099RPart2010.csv’ and save the file to your hard drive (it will save as a csv file). You should use this sample file to enter all of your payee data. We also provide a schema file that indicates the format the data needs to be entered onto the sample spreadsheet. Note: You may upload a spreadsheet for each payer's payees, one at a time or you may do one batch upload of all of your payer's payees together on a single spreadsheet. However, if you choose to do one batch, all payees must be listed together based upon the payer's TIN. The upload will not work if payer’s payees are sporadically placed throughout the spreadsheet.
- Once the file has been updated, click on ‘Upload 1099 Data’, then browse for and select the saved csv file. You will also need to enter the ‘Number of rows to ignore before header row’, which will typically be zero if you have not added rows to the top of the csv file.
- Click ‘Submit’ to upload the file. The results will give you the total number of payees added, as well as any ‘Bad Data’ that may have been uploaded.
1099 Software User Guide #
• Note: You should be aware that with either payer upload, the data you import will replace any data you have already entered. Once the upload has been completed, whether you used Option 1 or Option 2, you will notice that all the Payees you have uploaded are listed in the drop‐down box within the ‘Edit Payees’ box. You should run the edit checks – see below for more details.

Once your payee data is entered you can run edit checks to check data integrity. Before doing this, however, you need to select the payees that you want to include. Click ‘Select Payees’ in the Edit Payees box and check the box next to each name you want to select. Then click ‘Update’. You’ll see the number selected noted in that box – see:
‘Selected Participant Count: 8’ in the screen shot below.
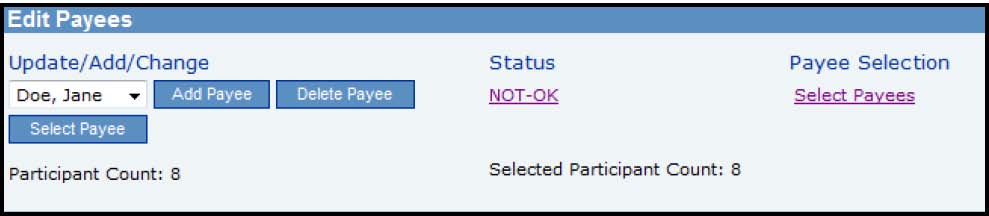
You can run edit checks one of two ways:
- By clicking the ‘???’ or ‘NOT‐OK’ in the Status column; this lists all errors for all selected payees.
- Select each payee individually – select the Payee from the drop down box and click ‘Select’. This will open the 1099‐R for that payee; then click ‘Run Edit Checks’. All questions on the 1099 that do not pass an edit check will be highlighted in yellow. You can double click on the yellow box to see the reason for the edit check.
Once your data is entered and the edit checks have been run you are ready to print the forms.
1099 Software User Guide #
Section E. Printing the Forms:
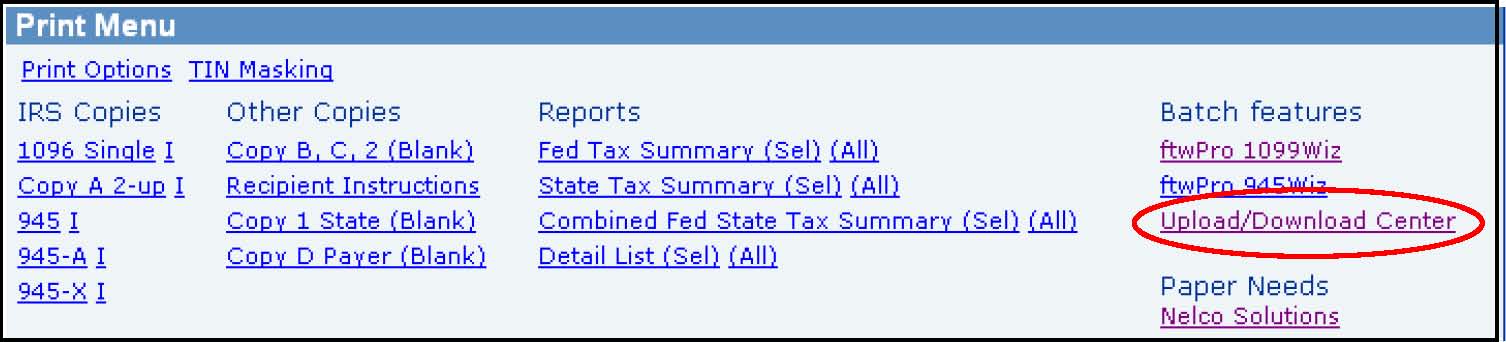
The Print Menu box on the main Form 1099‐R – 2010 page of the website is where you will go to select your printing options and print your forms. You’ll see that the menu is arranged into four columns – IRS Copies, Other Copies, Reports and Batch Features.
If you are printing and mailing the forms yourself, you will do this from the Print Menu on the main 1099/5498 page of the website. See page 15 for information on the ftwilliam.com Fulfillment Service – we can do the printing, mailing and e‐filing for you.
Aligning Your Printing
Before you print Form 1096 and Copy A, you should be sure that Acrobat is set up so that the pdf document is printed at 100% of its correct size. You should do this by clicking on the printer icon on the Acrobat tool bar that is located underneath the main browser toolbar. Make sure the "Page Scaling" setting under the heading "Page Handling" is set to "None". (The default value is oftentimes set to "fit to page" which will shrink the Schedule by 94%.) The "Page Scaling" setting must be set to "None" so that there is no size reduction on printing. You can confirm the proper setting by looking in the "Preview" section and observing that the zoom is 100%.
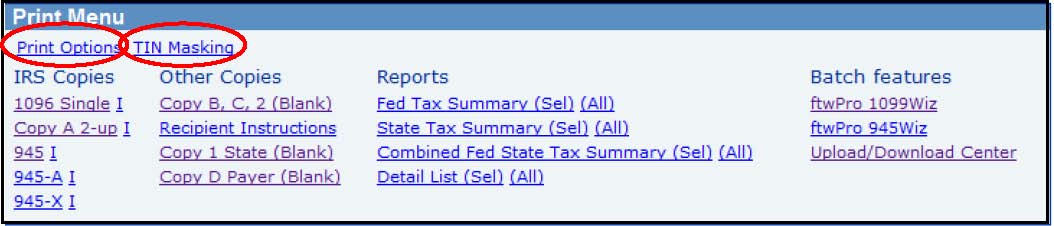
At the top of the menu box you’ll see two links; the first is ‘Print Options’ where you can adjust the margins of your printing to ensure your forms align correctly on the special paper you are using.
You can also make an election on TIN Masking from that link at the top of the Print Menu Box ‐if you enable TIN Masking all but the last 4 digits of the TIN/SSN will be masked just on the Payee copies (1099 Copy B, Copy C and Copy 2). Click on ‘TIN Masking’, select ‘Yes’ from the drop‐down box, and click ‘Update’.
Printing Copies of Form 1096.
You need to print these returns on 1up Preprinted paper. This is obtainable from Nelco Solutions, a vendor that ftwilliam.com works with. Or you can use your own vendor. Before printing copies of Form 1096 it is necessary to check your printer. Every printer is different and it’s important that yours is aligned correctly before you print multiple forms.
To check your printer, click on the ‘1096 Single’, in the Print Menu box. This will produce a blank Form 1096 just containing the payer data. Print this on plain paper and then hold the printed copy up to a sheet of the 1up Preprinted paper to see if the printing aligns correctly with the boxes on the form. If it is not aligned correctly, click on ‘Print Options’ and make appropriate adjustments. Test your printer again before putting the 1up Preprinted paper in your printer and printing all your 1096’s.
1099 Software User Guide #
Printing Copies of Form 1099.
You can print copies of Form 1099 for the payee (Copy C), and for filing with state (Copy 2) and federal (Copy B) taxes, You need to print these on 3up Perforated paper. Click on ‘Copy B, C, 2 (Blank)’. Put the 3up Perforated paper in your printer and print the copies. You should also print the Instructions for Recipient and mail with the Copy B, C, 2.
To print Copy A of Form 1099 you should perform the same printer test and, if necessary make adjustments, that is described above for Form 1096. Form 1099 Copy A is printed on Red Federal Pre‐Printed paper, available from Nelco Solutions or a vendor of your choice.
Section F. Form 945
Use Form 945 to report withheld federal income tax from non‐payroll payments, including:
Pensions (including section 403(b) and governmental section 457(b) plan distributions), annuities, and IRA
distributions;
Military retirement;
Gambling winnings;
Indian gaming profits;
Voluntary withholding on certain government payments; and
Backup withholding.
You should report all federal income tax withholding from non‐payroll payments or distributions annually on one Form
945. Do not file more than one Form 945 for any calendar year.
All federal income tax withholding reported on Forms 1099 (for example, Form 1099‐R or 1099‐MISC) or Form W‐2G
must be reported on Form 945. Do not report the following on Form 945:
Federal income tax withholding from wages.
Federal income tax withheld on distributions to participants from nonqualified pension plans (including
nongovernmental section 457(b) plans) and some other deferred compensation arrangements that are
treated as wages and are reported on Form W‐2.
Form 945 is the return filed by the payer with the IRS, representing the total amounts disbursed; so it’s a summary of all the information on the 1099s. This form is printed on blank paper. The 'top' portion is filled out automatically in most part from the 'Edit Payer' data. The Paid Preparer information at the bottom can be auto‐filled if paid preparer information is added ‐see below. Many of the remaining fields are calculated from data in the 1099s or 5498s.
You are responsible for filing your own Form 945; it is not included in the Fulfillment Services offered by ftwilliam.com.
• Tip for Companies who use their EIN and not a TIN to file 1099s and to make the Form 945 deposits: If the same EIN is used to file 1099s and to report taxes withheld for multiple plans you may file one Form 945. Otherwise, if a separate EIN/TIN is used for each plan, file one Form 945 for each plan.
1099 Software User Guide #
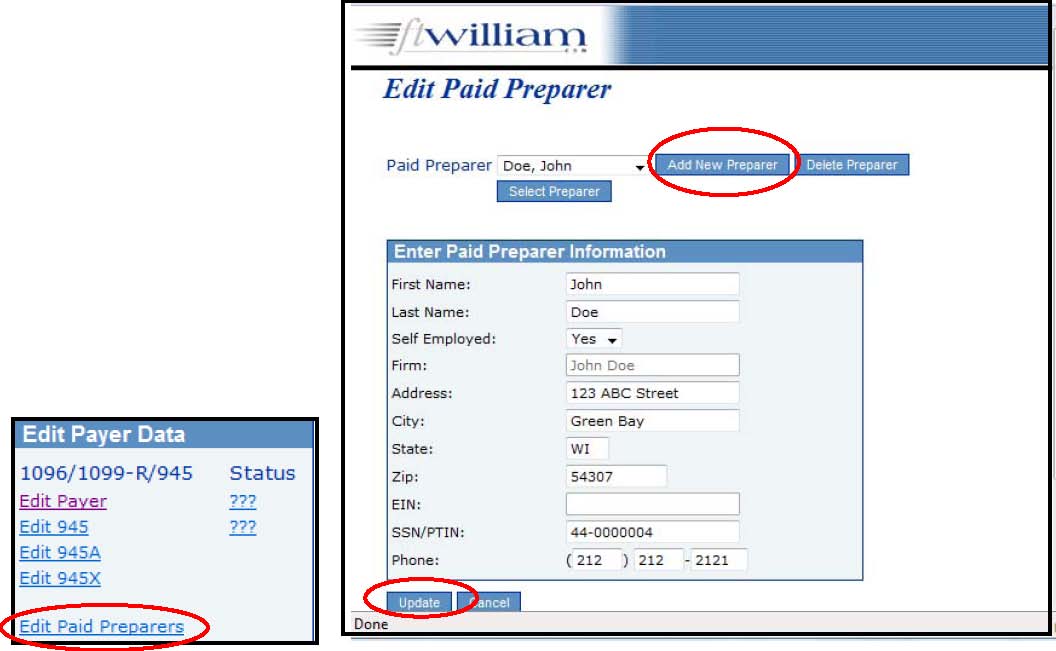
Adding Paid Preparers
If you have Paid Preparers working on any of your filings, you can add a record for them. Click the ‘Edit Paid Preparers’ link under ‘Edit Payer Data’, then click ‘Add Preparer’. Enter the preparer’s first and last names and click ‘Add Preparer’. You can then select the preparer and enter the rest of the information for them – click ‘Update’ to save the data.
Preparing Form 945
To prepare Form 945, click on the ‘Edit 945’ link on the left of the screen; this will open the form to allow you to make any required adjustments. You can also add a Paid Preparer, if applicable, by selecting them from the ‘Add Paid Preparer’ drop down box. To pull data from your already completed 1099s or 5498s, click on ‘Update Line 1 with Payee total W/H (Sel)’ or ‘All’. The first option will bring forward data just from payees that are marked as ‘Selected’; the second option will bring forward data from all payees within the given plan.
Once your Form 945 is complete you can run edit checks to validate your data. Click on ‘Run Edit Checks’ on the top‐left of the screen; any errors will be highlighted in yellow and you can double click on the yellow area to see the reason for the edit check.
1099 Software User Guide #
Batch 945 Printing
The ftwPro 945Wiz link, located at the bottom right of the Print Menu box, enables you to print all your 945s in a single pdf file. Click on the link shown in the screen shot below:

You’ll see the following screen:
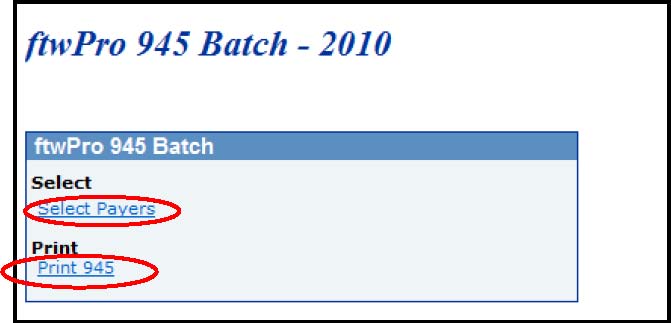
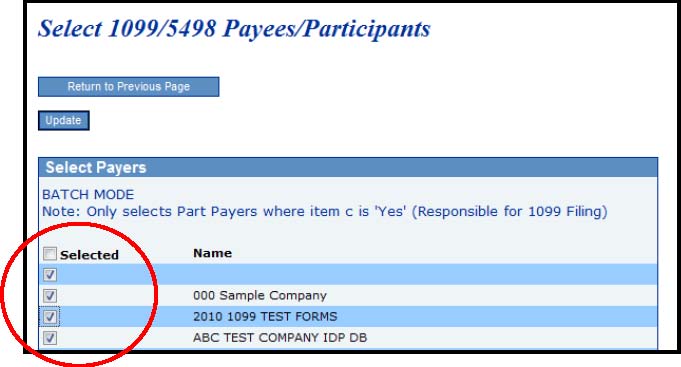
Click the ‘Select Payers’ link, then place a check mark next to each of the plans you want to include; if you want to include every plan, place a check mark next to the ‘Selected’ box at the top of the column, as shown in the screen shot below. Next, click ‘Update’; you’ll return to the screen shot shown above. Click on the ‘Print 945’ link to generate a pdf file for all the Payers you have selected.
1099 Software User Guide #
Section G. Other Reports
There are various reports available in the Print Menu box that you can run based on either all or selected payees. To run for selected payees, click ‘(Name of report)(Sel)’; to run for all payees click ‘All’
Federal Tax Summary – this lists all the payees for the payer including name, SSN, Gross Distribution, Taxable Amount and amount of Federal Withholding.
State Tax Summary ‐this lists all the payees for the payer including name, SSN, State ID, State Distribution amount, and amount of State Withholding.
Combined Fed State Tax Summary – this produces both the reports described above.
Detail List – this summarizes all the information entered by payee.
Section H. E‐Filing and the Batch Features
Filing via the FIRE system
You can do your own electronic filing of the federal copies using the ftwilliam.com website – the software enables you to create a text file which you can then upload onto the IRS FIRE (Filing Information Returns Electronically) site to e‐file.
The steps for this process are as follows:
- Obtain a Transmitter Control Code (TCC) from the IRS; this is a 5‐digit code and you’ll need to fill out Form 4419 to apply for one. There’s more information on the IRS website: http://www.irs.gov/taxtopics/tc802.html
- Send the TCC together with your company EIN via e‐mail to support@ftwilliam.com.com. We will then set you up for electronic filing.
- When you are ready to do your e‐filing, click on the ‘ftwPro 1099Wiz’ link in the Print Menu box of the Form 1099R – 2010 page of the website.
- Click ‘Create new batch’, give the batch a name so you can identify it, and click ‘Create new batch’.
- On the next screen, click the ‘Select Payers’ link. You’ll see a list of all the Payers that you have added across all your clients. For the Payers that you want to include in the batch, click on the ‘Select Payees’ link. You can then place a check mark, in the box in the column on the left, against each payee that you want to include in the batch file. If you want to include all the payees listed, click the ‘Select’ box at the top of the column.
- Make sure all edit checks are passed so that the status of all the payees is ‘OK’. Then you can lock the filing. Note
that you will not be able to lock the filing until all the edit checks have been passed. Below is a screen shot of the
list of current batches – it gives the batch name and number, the status of the edit checks for payers and payee
records, counts for both and the batch status. If the batch is locked, the date it was locked is indicated.
- When you select a batch that is locked, you’ll see a link to ‘Download file for FIRE system’. Clicking on this link will produce a text file that you can take to the IRS website to upload to complete your filing.

1099 Software User Guide #
The ftwilliam.com Fulfillment Service Bureau
Ftwilliam.com offers a service whereby we will mail and/or file your 1099s and related forms. Note that the options do not include filing of Form 945. Charges are per payee and for 2010 filings are specified below.
Forms 1099‐R, 1099‐MISC, 1099‐DIV
| Service | Description | Cost (2010) |
| Federal/State/Payee | 1. 1096 – efile 2. 1099‐R Copy A (Federal) – efile Copy 1 (State) – efile Copies B/C/2 (Payee) – print & mail 3. 1099‐Misc Copy A (Federal) – efile Copy 1 (State) – efile Copies B/2 (Payee) – print & mail 4. 1099‐Div Copy A (Federal) – efile Copy B (Payee) – print & mail | $1.75/payee |
| Federal/State Only | 1. 1096 – efile 2. 1099‐R Copy A (Federal) – efile Copy 1 (State) – efile 3. 1099‐Misc Copy A (Federal) – efile Copy 1 (State) – efile 4. 1099‐Div Copy A (Federal) – efile | $1.05/payee |
| Federal/Payee Only | 1. 1096 – efile 3. 1099‐R Copy A (Federal) – efile Copies B/2 (Payee) – print & mail 2. 1099‐Misc Copy A (Federal) – efile Copies B/2 (Payee) – print & mail 3. 1099‐Div Copy A (Federal) – efile Copy B (Payee) – print & mail | $1.25/payee |
| Payee Only | 1. 1099‐R Copies B/C/2 – print & mail 2. 1099‐Misc Copy B/2 – print & mail 3. 1099‐Div Copy B – print & mail | $0.84 /payee |
| Payer Only | 1099 Copy D – Payer (Not included in Federal/Payee) | $5.00/payer plus $0.45/payee |
1099 Software User Guide #
Form 5498
| Service | Description | Cost (2010) |
| Federal/Payee | 1. 1096 ‐efile 2. 5498 Copy A (Federal) – efile 3. 5498 Copy B (Payee) – print & mail | $1.25/payee |
| Federal Only | 5498 Copy A (Federal) – efile | $0.50/payee |
| Payee Only | 5498 Copy B (Payee) – print & mail | $0.84 /payee |
| Payer Only | 5498 Copy C – Trustee/Issuer (Not included in Federal/Payee) | $5.00/payer plus $0.45/payee |
Please note there will be an additional 50% per form charge for submissions made after January 23. The cutoff for all submissions is Noon, CST on January 30.
To use this service, you do not need to get a TCC number from the IRS as ftwilliam.com is doing the filing for you. Follow steps 3 thru 6 above. When you select a batch that is locked, you’ll see various links under ‘Fulfillment Service’. Click on the option you want from the choices described above. Note that the software will provide the total cost for each option, based on the number of payees you have selected. When you click on the next link, the software will transmit your batch file to ftwilliam.com and we will process it based on whichever option you selected, and send you an invoice for the cost
Please note that if you want two services, e.g. Payee 1099 printing and mailing only ($0.84 per payee and Payer 1099 printing and mailing only ($0.45 per payee), you would need to send two separate requests, each with the batch file.
Volume Pricing
The above prices are for up to 5000 payees. If you have more you may be eligible for volume pricing ‐a down payment of 50% is required before fulfillment. Please contact support@ftwilliam.com for pricing and payment information.